Building Mike Rogers’ “Beantown Banshee”
Tamiya’s 1/48th-scale P-51B kit (#61047) has been around since 1996, but despite its age it’s still one of the best and most accurate for the money. Start by painting and assembling the detailed eight-piece cockpit “interior green,” FS-34151. The instrument panel should be painted semi-gloss black; once you apply the included decal, you’ll have a convincing “front office.” You could spend a few dollars on the True Details aftermarket resin cockpit (#48-485), but the Tamiya kit rendition is adequate. The only addition I made to my Mustang was a set of Eduard prepainted, etched-metal seat belts.
Before gluing the fuselage pieces together, locate and glue—from the inside—the horizontal stabilizers into place. Also carefully position the upper wing panels in place on their corresponding fuselage sides. Cementing the wings to the fuselage on the inside will all but eliminate any need to fill and sand those seams later on. Glue the completed cockpit into one side of the fuselage, making sure it lines up square with the opposite side part. Take special care around the area of the radiator underside air scoop. Next attach the engine compartment upper cowling, along with the front fuselage air intake fairing. Paint the exhaust pipes rusty brown and set them aside for attachment later.
At this point basic construction is complete, though you may need to do some minor sanding and cleanup on the seams. Stuff some wet tissue into the cockpit and spray a light coat of primer overall to highlight any flaws. Set your model aside to allow the primer to dry, then touch up the imperfections.
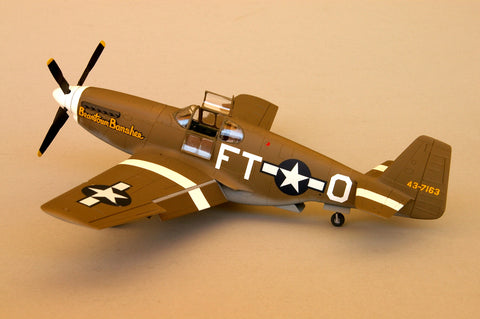
Mike Rogers’ first P-51B was manufactured and painted at the North American Aviation plant in Dallas, Texas, with standard olive drab topsides, FS-34087, and neutral gray, FS-36270, undersides. The aircraft was then most likely partially disassembled, crated and shipped to England. After it was reassembled, maintenance crews painted 15-inch-wide white stripes on the wings and stabilizers, in addition to white trim on the nose—markings used to help Allied forces identify the new fighter, which some thought looked like the Luftwaffe’s new Me-109G-6.
According to my calculations, the 15-inch stripes on the Mustang’s wings and stabilizers equal 5.3mm when converted to 1/48th scale. Tamiya produces 6mm- wide masking tape, which I trimmed down by a hair’s width on each side. (I could have used white decal stripes for the markings, but painted-on markings look much more realistic.) I positioned the trimmed tape on the top and bottom of the wings and stabilizers, using it as a guide for the ID stripes. I masked each wing and stabilizer, then pulled off the tape—leaving a 5.3mm space to be painted.
Paint the wheel wells interior green, but note that the insides of the gear doors were generally left in unpainted aluminum. The tires should be aircraft interior black, FS-37038, with either neutral gray or silver hubs. Paint the props flat black with gloss yellow tips. Once painting is complete, spray a clear gloss coat overall to give the decals a smooth finish to adhere to.
You’ll have to cobble together the markings for Rogers’ P-51B. I found the name, Beantown Banshee, for the nose and the Stars and Bars on an out-of- production Super Scale sheet, #48-590; the white side codes are from the Detail and Scale sheet, #48-1048; and the yellow tail serials came from an Aero-Master sheet, #72-167.
Painting the “birdcage” canopy can be a nightmare. But by using Eduard Models’ sheet of precut vinyl masks, EUEX-034, you can finish your model with little difficulty.

this article first appeared in AVIATION HISTORY magazine